


Apple Rosette Pie

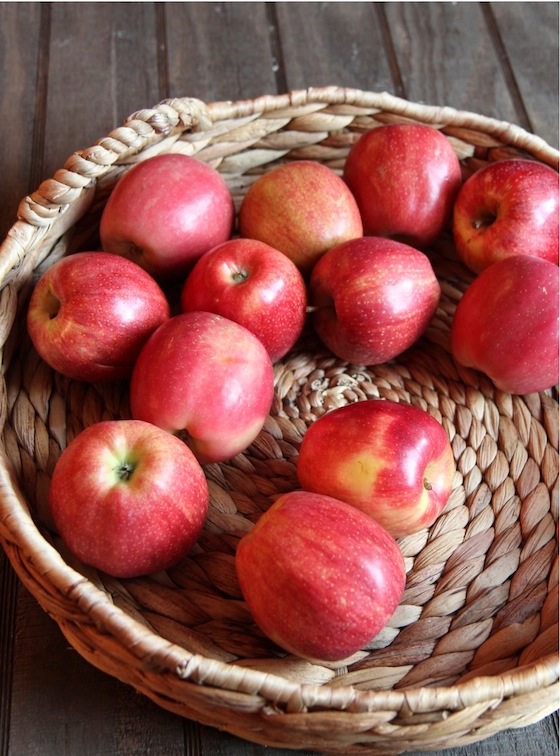
I'ts hard to see the enormous amount of apples in the farmer's markets right now and not think of apple pie. I was going to make a straight up apple pie for you with a cheddar cheese crust but then I decided to make it a little more fun. Instead of adding the cheese to the crust, I put it in the filling and made pretty rosettes on top from thin apple slices instead of a pie crust.
The apple rosettes are actually pretty fun to make but much easier if you have a mandoline. Please see the notes about using a mandoline in the recipe header. If you don't have a mandoline, this may be the time to buy one - you will be so glad you have it in your gadget collection. I use mine all the time to slice beets for salads, apples for chips, potatoes for pizza, etc.
Apple Rosette Pie

for a printable recipe click here
a Mandoline makes this recipe a thousand times easier. This is the one I have but you can always get a smaller, cheaper version like this one. It's very difficult to cut the apple slices by hand as thinly, uniformly and quickly as you can on a mandoline. If you've never used a mandoline before, by careful and use the hand guard that comes with it - the cutting blade is extremely sharp.
Ingredients:
for the dough:
- 1¾ cups all purpose flour
- 1 teaspoon sugar
- 12 tablespoons cold butter (1½ sticks) cut into slices
- ¼ cup ice cold water
for the filling:
- 3 large red apples (I used Gala. Each apple was about 10 to 10½ ounces in size)
- 2 Tablespoons flour
- ⅓ cup sugar
- 1 teaspoon cinnamon
- 1 Tablespoon lemon juice
- 1 cup grated sharp white cheddar cheese (about 2½ ounces)
- ¼ teaspoon kosher salt
for the rosettes:
- 5 large red apples (I used Gala. Each apple was about 10 to 10½ ounces in size)
- 2 lemons, juiced
- ½ cup sugar, divided
- 3 Tablespoons melted butter
- ¼ teaspoon cinnamon
Instructions:
Make the dough:
Place flour and sugar in a food processor. Pulse. Add about half of the butter. Pulse. Add the rest of the butter. Pulse until the mixture turns into coarse crumbs. Through the feed tube, slowly add most of the ice water and pulse until the dough gathers up into a ball - you don't want the dough too wet, so don't add all of the ice water at once. If it doesn't gather up into a ball after you've pulsed it several times, add a few more drops of ice water until it does. Take the dough and flatten it into a disc and place it on a sheet of floured plastic wrap and wrap it up. Refrigerate for about 30 - 40 minutes.
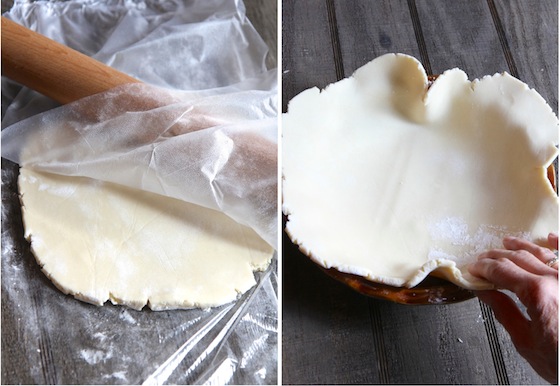
Lightly spray a deep dish pie pan with cooking spray. Remove dough from fridge and roll out between two sheets of floured plastic wrap or wax peper until it is just a little larger than the pie pan. Remove top layer of plastic wrap, place rolling pin on one edge of the dough and gently roll the dough around the rolling pin, letting the bottom plastic wrap fall off. Transfer to the pie dish and unroll. Press the dough into the pan and crimp the edges. Place back into the refrigerator.
Make the filling:
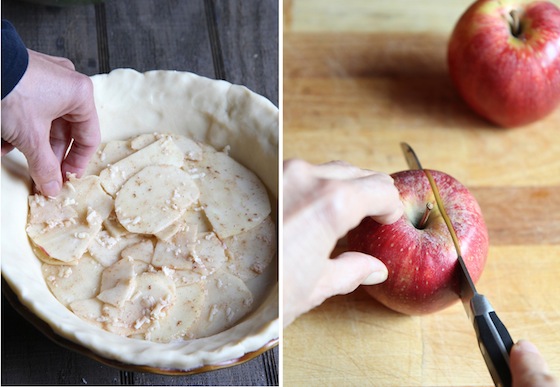
Peel, core and slice the apples. For the filling, the slices do not have to be as thin as they do for the rosettes. Toss the rest of the ingredients for the filling in a large bowl and thoroughly mix. Add the apple slices and toss until coated. Place the apple slices in the chilled pie crust. I layered mine as evenly as I could to create a flat surface for the rosettes. Press down gently after you have all the slices in the pie crust to make them fairly flat. Refrigerate.
Make the Rosettes:
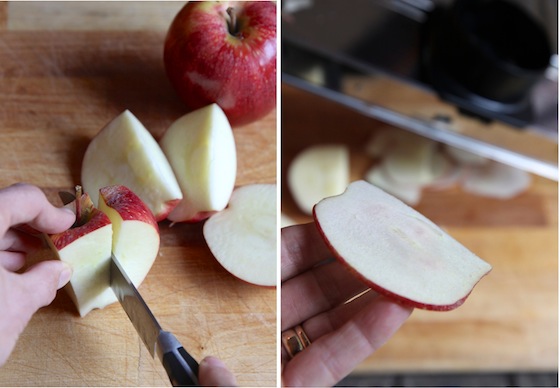
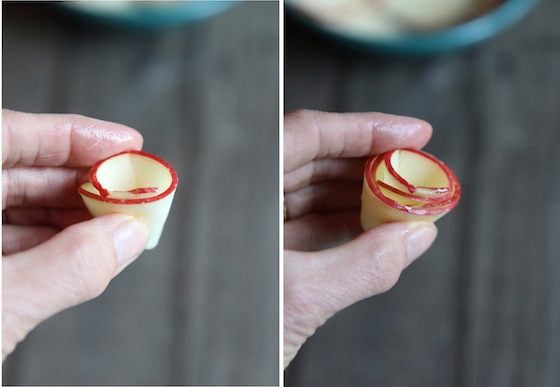
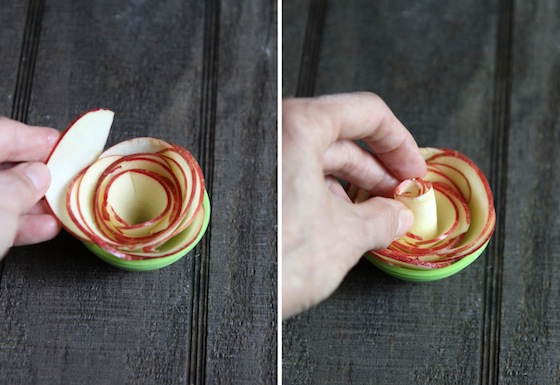
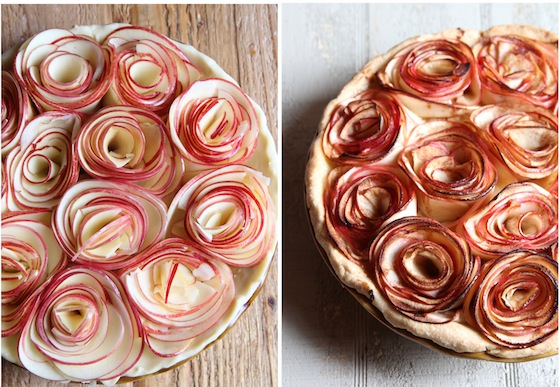
Preheat your oven to 375° F. One large apple makes about 3 Rosettes. This will depend, of course, on what size apples you have and how you slice them. Cut the apples into five chunks by cutting down around the core. Usually the first slice is very large - cut this in half and then continue to cut the apple off the core (see photos in the post). You want chunks that are flat so you can slice them on the mandoline. I did one apple at a time. Adjust the mandoline blade until it is almost at the thinnest setting. Carefully slice the apples, laying the pieces so that each slice has a little red peel on it. They should be very thin so they are pliable - they will become a little more pliable after they are tossed with the lemon juice. If they are not thin enough, adjust blade. Gently toss the apple slices in a bowl with about 1 Tablespoon of lemon juice and 1 Tablespoon of sugar until coated. You will have some variation in the size of the apple slices - that's what you want. Start making a rosette by making a circle with one of the smaller slices. Hold it with your fingers and wrap a second slice around the outside of the first, making sure the red peel is on top. Continue in this manner, adding larger slices all the way around. I found that when the rosette was about half the size I wanted, I held it inside a little prep bowl (a small muffin tin would work also) and then added more apple slices to it there. It was like having a third hand to help me. The rosette is going to unwind a little bit and leave a gap in the center. I took small slices and curled them up and placed then on the inside to fill in these gaps.
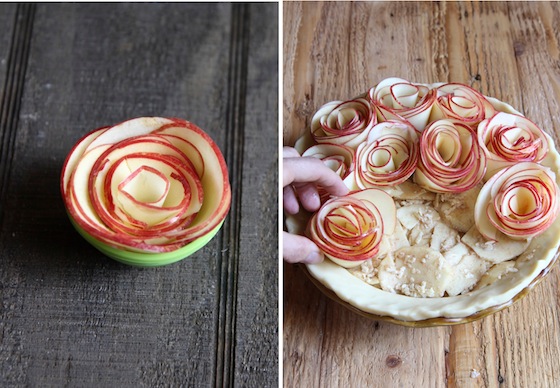
Repeat with remaining apples until you think you have enough rosettes to cover the top of the pie. Remove the pie from the fridge and carefully transfer the rosettes from your little prep cups or muffin tin to the top of the pie. I let any lemon juice drain from the rosette first before I placed it on the pie. Cover the top of the pie completely with rosettes (mine took 12 rosettes).
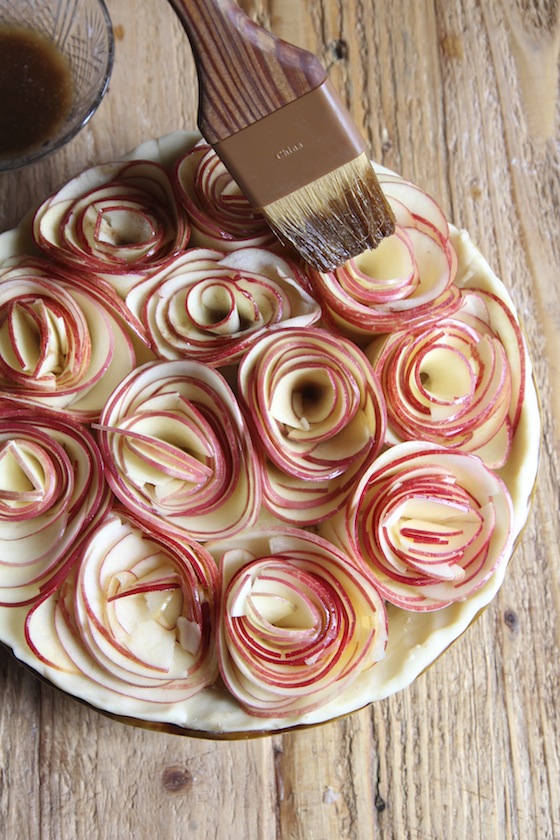
Combine the melted butter and cinnamon together in a small bowl and brush the tops of the rosettes with this mixture. Sprinkle remaining sugar over the top of the rosettes. Place in the oven and bake for about 20 minutes. Lower the heat to 350° and bake for another 50 minutes. If the crust or the rosettes get too dark, you can loosely set a piece of foil over the top. Remove from oven and let cool for 30 minutes before serving.
 8 Comments
Reader Comments (8)
Oh Elaine, this is gorgeous! I am so making this now that it's fall. Oh my goodness I just can't get over how stunning it looks.
Quick question, how do you stop the rosettes from unravelling as you place them in the pie?
My bestie gf just shared this amazing recipe and your blog. How will I get anything done?? I want to read every post! Ciao, bella!
Everything you create is a work of art...beautiful<3
looks delicious!
I would not want to cut this - just look at it! But seriously, how DID you cut it - do the rosettes hold together because they are now cooked through? Absolutely gorgeous.
What a beauty of a tart. I've seen this on Pinterest and been wanting to try it. Yours looks so lovely.
This has to be the prettiest apple pie...those rosettes are just beautiful! Luv your blog and the recipes you've featured!
You are artist! Thank you for sharing.