In all the years of writing this blog, the most popular post ever has been the one I wrote about No-Knead Artisan Bread. This method, popularized by Zoe Francois and Jeffrey Hertzberg, revolutionized homemade bread baking. Instead of making up a batch of dough every time you want to bake bread, you make up a large batch of very wet dough and let it do a long, cold fermentation in the refrigerator - no kneading, no fuss. You can store the dough in the fridge for up to two weeks, tear a hunk of dough off and make bread whenever you feel like it. A variation of this method was also developed by Jim Lahey of the Sullivan Street Bakery. Suddenly, it seemed, everyone was making homemade bread with these methods. In the five years since I wrote that post, I've learned a few things and tweaked the recipe a little. I thought it was time to do an update.
Zoe and Jeffrey's approach is to make a very wet dough, let it rise and then let it sit overnight in the fridge. You then shape a piece of the dough, let it rise and then bake it on a pizza stone in the oven. They liked to place a cup of water into a pan beneath the rack with the bread, creating a little steam for the crust. In Jim Lahey's version, a smaller batch of wet dough is worked up and allowed to rise about 18 hours then wrapped in a towel to rise again and baked in a heavy cast iron or ceramic pot. Both methods are terrific. I like making up a larger batch of dough so I can keep it in the fridge and just make bread or rolls whenever I want. I was baking my bread on a pizza stone but then tried Lahey's version of baking it in my Le Creuset pot. I really liked doing it this way and that's how I've been doing it for a while.
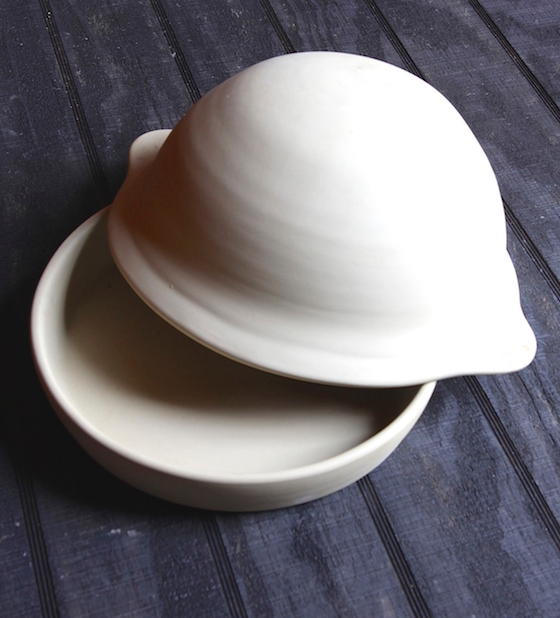
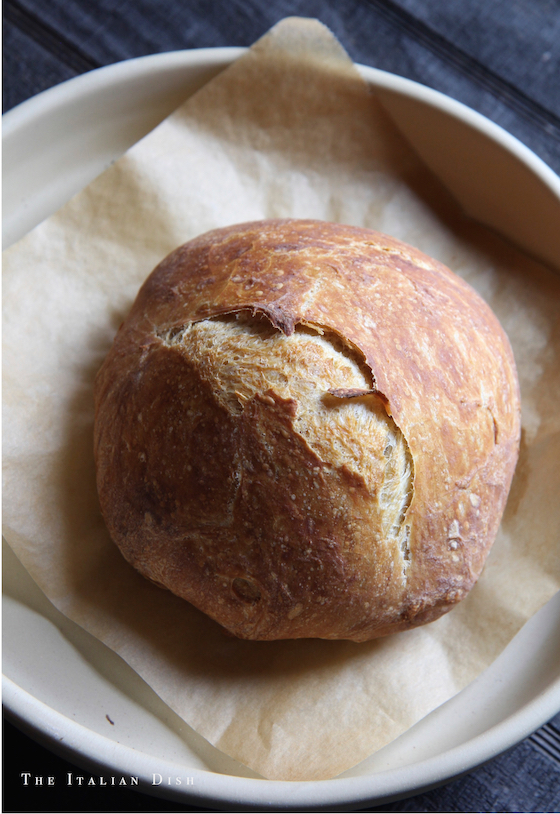
Right around the same time as I was thinking I should write an update to my old post, Emerson Creek Pottery sent me a Bread Cloche to try out. Now, since I was pretty happy with baking my bread in my Le Creuset pot, I was sceptical that baking the bread in this cloche was going to make any difference, but I tried it anyway. What a surprise! Both my husband and I noticed the difference in the crust. I'm not sure what exactly is happening here, but I love the result. The Bread Cloche is my new favorite thing and Emerson Creek Pottery has agreed to give one away to a lucky reader. If you want a chance to win one of these, just leave a comment at the end of this post and a winner will be selected randomly by Wednesday, June 10th.
(This contest is now closed) Congratulations to Joann Heremma for winning!
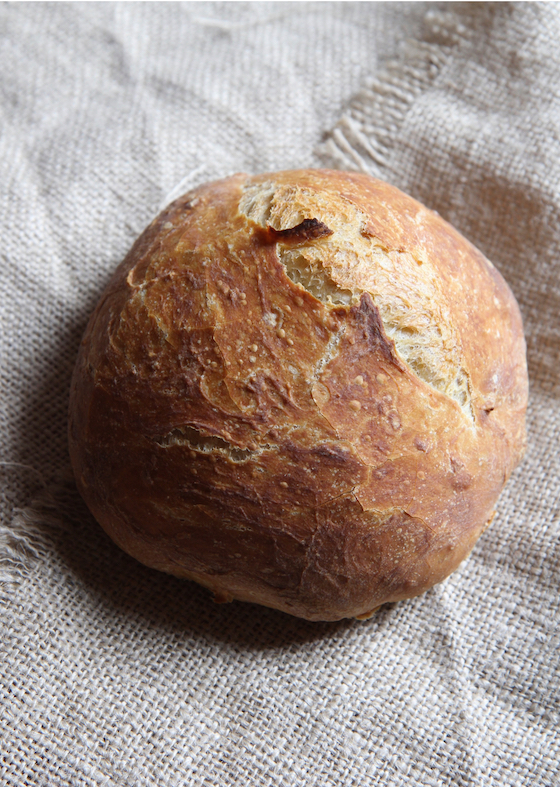
I've made hundreds of loaves of this Artisan bread and have changed a couple of things. For one, I do not do the water in the pan beneath the bread anymore. I'm pretty sure this led to my oven window eventually cracking and having to be replaced. The crust was better with the steam but it was okay without it. With the Bread Cloche, though, the crust is so amazing that I don't miss the steam at all. If you are pretty sure you are never going to buy a Bread Cloche, please go ahead and try the bread in a dutch oven kind of pot. It does make a big difference.
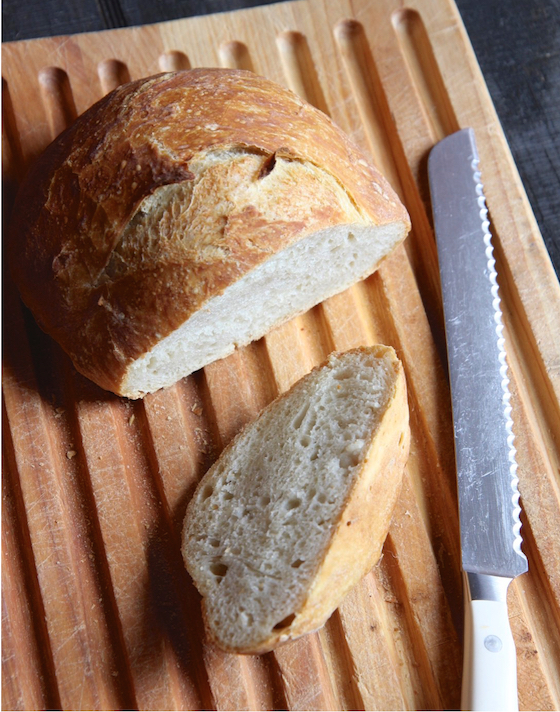
Another change is that sometimes I don't bother to slash the top of the loaf. I've found that I still get a pretty good looking loaf, especially in the Bread Cloche. I am also baking the loaf a little longer - until it is a deeper color than I used to. The texture of the bread is better and I have less problem with it being gummy.
This recipe is my version with these changes. If you haven't tried making homemade bread, you really should - it's hassle free, cheap as can be, and the results are outstanding. And the Bread Cloche is a big plus - you're going to want one! Just leave a comment at the end of the post to have a chance to win one! Be sure to include your e-mail so you can be notified if you win. Giveaway ends at midnight, June 9th - A winner will be picked randomly on Wednesday, June 10th.
(This contest is now closed)
Artisan Homemade Bread
for a printer friendly recipe click here
makes 4 - 5 small loaves (you can also make rolls easily with this bread).
● I use a plastic container with a small hole punched in the lid to store the dough. If you don't have one, you can use a very large bowl with plastic wrap and a hole punched in the wrap. But if you're going to make dough on a regular basis, I would buy a dedicated plastic container. If you want to know the container I use for my dough it's this 21-cup container from Rubbermaid. I love it because it doesn't take up make space in the fridge and most of the time I keep it in the door of the fridge, where it fits nicely.
● This dough is much more easy to work with if you let the dough rise all night, so I highly recommend making your batch of dough the day(s) before you want to use it. The dough actually develops more flavor the longer it sits in the fridge! You can keep the dough in the fridge for 2 weeks.
3 cups room temperature water
1½ Tablespoons instant yeast (instant yeast is awesome - no proofing is needed)
1½ Tablespoons kosher salt
6½ cups flour (I use half Bread Flour and half regular AP flour)
Place the water in a large bowl and add the yeast and whisk. Add the salt and whisk. Start adding the flour and blend until all the flour is incorporated (I use my KitchenAid mixer with the dough hook to do this). Transfer the dough to a plastic container with a small hole punched in the top to allow the gases to escape. Let rise for about two hours. I lift the container up and let it drop on the counter to collapse the dough inside. Then just stick it in the fridge all night.
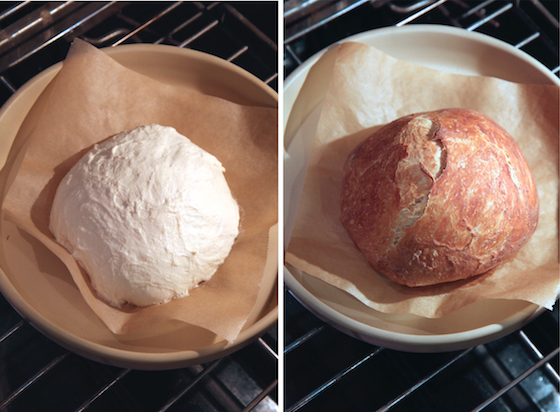
When you want to bake bread, allow about an hour and half from start to finish. Here is the way I do it: I have divided this whole process into four 20 minute steps. Place a piece of baking parchment on your counter and tear off the amount of dough that you want. The great thing about this dough is that you can do exactly that - bake a very small loaf of bread or a large one. Shape the dough into a tight ball, placing your thumbs on top of the loaf and pulling them down and under the dough, creating a nice surface tension on the top. Place the dough on the parchment paper and let rise for 20 minutes. Place your Bread Cloche or a heavy cast iron pot with a lid in your oven and turn the oven to 450° F. to preheat. Continue to let the bread rise on the counter another 20 minutes.
After the dough has risen, open the oven door and carefully remove the lid from you Cloche or pot. Transfer the bread dough, along with the parchment paper, to the pot and place the lid back on. Bake for 20 minutes. Remove the lid and bake for another 20 minutes (this will depend on how large a batch of dough you are making) or just until the bread is a deep golden brown. Baking the bread until it is a deep color is the key to preventing a gummy interior.
Remove from the oven and allow to sit for at least 15 minutes before serving. Easy!
Giveaway ends at midnight, June 9th - Be sure to include your e-mail so you can be notified if you win - A winner will be picked randomly on Wednesday, June 10th.
(This contest is now closed)